How to Tie a D Rig for Carp Fishing
Carp fishing is an art and a science, and the D rig is one of the most effective and versatile rigs you can use. It’s known for its excellent hooking potential and effectiveness with pop-up baits. This comprehensive guide will walk you through the process of tying a D rig, explain when and why to use it, and provide tips on getting the most out of this setup.
Table of Contents
- Introduction to the D Rig
- Materials Needed
- Step-by-Step Guide to Tying a D Rig
- Preparing the Hooklink
- Tying the Knotless Knot
- Forming the "D" Loop
- Attaching the Bait Screw or Rig Ring
- Completing the Rig
- When and Why to Use a D Rig
- Tips for Effective Carp Fishing with a D Rig
- Common Mistakes and How to Avoid Them
- Advanced Techniques and Variations
- Maintenance and Care for Your D Rigs
1. Introduction to the D Rig
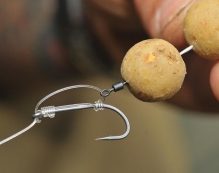
The D rig is named for the distinctive "D" shape formed by the loop of the hooklink material behind the hook eye. This loop allows for improved bait presentation and a more effective hooking mechanism. The D rig is particularly effective for pop-up baits, ensuring that the bait is presented off the bottom, making it more attractive and accessible to carp.
2. Materials Needed
To tie a D rig, you will need the following materials:
- Hooklink Material: Fluorocarbon is preferred for its stiffness and low visibility underwater.
- Hooks: Wide gape hooks are ideal. The size of the hook depends on the size of the bait and the target carp.
- Bait Screw or Rig Ring: To attach the bait.
- Bait: Typically pop-up boilies.
- Scissors or Snips: For cutting the hooklink material.
- Knot Puller Tool: Helps in securing knots tightly.
- Lighter or Baiting Needle: For certain knot types and to melt tag ends.
3. Step-by-Step Guide to Tying a D Rig
Preparing the Hooklink
- Cut the Hooklink: Start by cutting a length of hooklink material. Around 12-15 inches is a good starting point.
- Thread the Hook: Thread one end of the hooklink through the back of the hook eye, ensuring it extends past the bend of the hook by a few inches.
Tying the Knotless Knot
- Position the Hooklink: Hold the hook and hooklink so that the hook point is facing upwards and the hooklink is positioned along the shank.
- Wrap the Hooklink: Make 6-8 tight wraps around the shank of the hook, moving towards the bend. Ensure the wraps are neat and even.
- Secure the Knot: After completing the wraps, thread the end of the hooklink back through the hook eye from front to back. Pull tight to secure the knot.
Forming the "D" Loop
- Form the Loop: With the remaining length of the hooklink, form a small loop extending from the hook eye to the bend of the hook. This will create the "D" shape.
- Secure the Loop: Pinch the loop to maintain its shape and position. Then, take the free end of the hooklink and wrap it around the shank once or twice, close to the hook eye.
Attaching the Bait Screw or Rig Ring
- Add the Bait Screw or Rig Ring: Slide the bait screw or rig ring onto the loop, ensuring it moves freely.
- Close the Loop: Bring the free end of the hooklink back through the hook eye once more from front to back. Pull tight to secure the "D" loop and ensure it retains its shape.
Completing the Rig
- Trim the Excess: Trim any excess hooklink material close to the knot. Use a lighter or baiting needle to carefully melt the tag end, preventing it from fraying.
- Attach the Bait: Screw your chosen bait onto the bait screw or attach it to the rig ring.
- Final Adjustments: Check the length and shape of the "D" loop. Ensure the bait is positioned correctly and the rig is secure.
4. When and Why to Use a D Rig
The D rig is especially effective in certain conditions and for specific bait presentations. Here’s when and why you should consider using it:
- Pop-Up Presentations: The D rig excels with pop-up baits, ensuring they are presented just off the bottom.
- Clear Waters: Fluorocarbon hooklinks are less visible, making this rig ideal for clear water conditions.
- Cautious Carp: The D rig's mechanics and presentation can fool wary or pressured carp.
- Weedy or Silty Bottoms: The elevated bait presentation can avoid debris and ensure better visibility to carp.
5. Tips for Effective Carp Fishing with a D Rig
- Bait Choice: Use high-visibility or high-flavor pop-ups to attract carp.
- Rig Maintenance: Regularly check your rig for damage or wear and retie if necessary.
- Bait Presentation: Ensure the bait is buoyant enough to stay elevated but not too buoyant to lift the hook off the bottom.
- Sharp Hooks: Keep your hooks razor-sharp for better hooking efficiency.
6. Common Mistakes and How to Avoid Them
- Improper Knot Tying: Ensure all knots are tight and secure to prevent them from slipping.
- Incorrect Hook Size: Match the hook size to your bait and target fish size.
- Poor Loop Formation: Maintain the "D" shape loop for optimal bait movement and hooking potential.
7. Advanced Techniques and Variations
- Combi Rigs: Combine the D rig with other rig components for varied presentations.
- Adjustable Hair: Use adjustable hair rigs to vary the bait height.
- Hooklink Length: Experiment with different hooklink lengths based on fishing conditions.
8. Maintenance and Care for Your D Rigs
- Inspect Regularly: Check for frayed hooklink material or damaged hooks.
- Store Properly: Keep your rigs in a rig box to prevent tangles and damage.
- Replace When Necessary: Retie or replace rigs that show signs of wear.
By following these detailed steps and tips, you can tie an effective D rig and improve your carp fishing success. Practice makes perfect, so take your time to master each step and adapt the rig to your specific fishing conditions. Happy fishing!


190 Replies to “Tying a D rig and when to use it”
Juust desire to say your article is as amazing. The clarity in your post iis just nic and i could assume you’re an expert oon this
subject. Well with your permission allow me to grab your feed to
keeep up to date with forthcoming post. Thanks a million and pleease keep up the gratifying work.
코웨이매트리스렌탈 (Nan)
I always spent my half an hour to read this blog’s posts everyday along with a cup of coffee.
It is in point of fact a great and useful piece
of information. I am glad that you just shared this helpful info with us.
Please stay us up to date like this. Thanks for sharing.
Howdy! I could have sworn I’ve been to this site before but after reading through some of the post I
realized it’s new to me. Nonetheless, I’m definitely happy I found it and I’ll be book-marking and checking back often!
I’ve been exploring for a little for any high-quality
articles or weblog posts on this sort of space . Exploring in Yahoo
I at last stumbled upon this website. Reading this info So i’m happy to express that I have a very excellent uncanny feeling
I discovered exactly what I needed. I most undoubtedly will make certain to do not overlook this web site and give it a
glance on a constant basis.
I have been exploring for a little bit for any high quality articles or blog posts in this kind of space .
Exploring in Yahoo I ultimately stumbled upon this website.
Reading this info So i am happy to exhibit that I have a very good uncanny feeling I discovered just what I needed.
I so much indubitably will make certain to do
not disregard this site and provides it a glance on a relentless basis.
Excellent blog you have here.. It’s hard to find high quality writing like yours nowadays.
I seriously appreciate people like you! Take care!!
Greetings from Idaho! I’m bored to death at work so I decided to browse your blog
on my iphone during lunch break. I love the info you provide here and can’t wait to take a look when I get home.
I’m shocked at how fast your blog loaded on my cell phone ..
I’m not even using WIFI, just 3G .. Anyhow, fantastic
site!
An impressive share! I’ve just forwarded this onto a coworker who had been conducting a little homework on this.
And he in fact bought me lunch simply because I stumbled upon it for him…
lol. So let me reword this…. Thank YOU for the meal!!
But yeah, thanx for spending some time to talk about this matter here on your
blog.
Your mode of describing all in this article is in fact pleasant, every one be capable of
without difficulty know it, Thanks a lot.