How to Tie a Basic Carp Hair Rig
Carp fishing is a popular and rewarding pastime, offering anglers the opportunity to catch large, strong fish that put up a great fight. One of the most effective techniques for catching carp is the hair rig. This rig is designed to present bait in a way that encourages carp to take it confidently, increasing your chances of a successful hook-up. In this comprehensive guide, we will walk you through the steps to tie a basic carp hair rig, including the materials you need, the process of tying the rig, and tips for using it effectively.
Materials Needed
Before you start tying your hair rig, gather the following materials:
- Hook: A size 6 to 10 carp hook is ideal.
- Hooklink Material: Braided hooklink material or coated braid (15-25 lb test).
- Hair Stop: These are small pieces of plastic or rubber that keep the bait on the hair.
- Bait: Boilies, corn, pellets, or other carp baits.
- Baiting Needle: A tool for threading the bait onto the hair.
- Scissors: For cutting the hooklink material.
- Knot Puller Tool: Optional but useful for tightening knots.
- Swivel: To attach the rig to your mainline.
Step-by-Step Instructions
Step 1: Cut the Hooklink Material
Start by cutting a length of hooklink material. A good starting length is about 12 inches (30 cm). This will give you enough material to tie the rig and make adjustments as needed.
Step 2: Tie a Small Loop
At one end of the hooklink material, tie a small overhand loop. This loop will form the hair, where the bait will be attached. The loop should be about 1 inch (2.5 cm) long.
- Form a loop at the end of the hooklink material.
- Pass the tag end through the loop to create an overhand knot.
- Moisten the knot and pull tight.
Step 3: Attach the Bait
Using a baiting needle, thread your chosen bait onto the hair. If using a boilie, insert the needle through the center of the boilie, attach the loop to the needle, and pull the bait onto the hair. Secure the bait with a hair stop.
- Push the baiting needle through the bait.
- Hook the hair loop onto the needle.
- Pull the bait down onto the hair.
- Insert a hair stop through the loop to keep the bait in place.
Step 4: Position the Hair
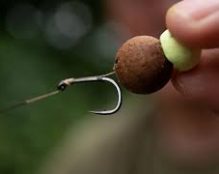
Adjust the length of the hair so that the bait sits just below the bend of the hook. This positioning is crucial for ensuring that the carp takes the hook into its mouth when it tries to eat the bait.
Step 5: Attach the Hook
Now, thread the other end of the hooklink material through the eye of the hook from the back (point side) to the front. This ensures that the hook will sit correctly in the carp’s mouth.
- Pass the hooklink material through the eye of the hook from the back.
- Slide the hook down to the bait, ensuring the hair length is correct.
Step 6: Tie the Knotless Knot
The knotless knot is a simple and effective way to attach the hook to the hooklink material. Follow these steps:
- Hold the hook and the hooklink material together.
- Wrap the hooklink material around the shank of the hook 7-10 times, starting near the eye and working towards the bend.
- After completing the wraps, pass the tag end of the hooklink material back through the eye of the hook from front to back.
- Moisten the knot and pull tight.
Step 7: Attach the Swivel
At the other end of the hooklink material, tie a swivel using a simple knot, such as a figure-of-eight loop knot or a uni knot. This swivel will be used to attach the rig to your mainline.
- Pass the tag end of the hooklink material through the eye of the swivel.
- Tie a figure-of-eight loop knot or a uni knot.
- Moisten the knot and pull tight.
- Trim any excess material.
Tips for Using the Hair Rig
- Bait Selection: Use baits that are attractive to carp, such as boilies, sweetcorn, pellets, or even homemade dough baits. Experiment with different flavors and sizes to see what works best in your fishing location.
- Hook Size: Choose a hook size that matches the size of your bait and the size of the carp you are targeting. Smaller hooks are better for smaller baits, while larger hooks are suited for bigger baits and larger fish.
- Hair Length: Adjust the length of the hair to ensure the bait sits just below the bend of the hook. This positioning helps ensure the hook catches in the carp’s mouth when it tries to eat the bait.
- Hooklink Material: Use a hooklink material that is strong enough to handle the size of the carp you are targeting. Braided materials are popular because they are supple and provide good bait presentation.
- Rig Presentation: Ensure that your rig is presented well on the lakebed. Use a PVA bag or stick mix to enhance the attraction around your bait.
- Location: Carp are often found near features such as weed beds, lily pads, and underwater structures. Use a marker float to find these areas and present your rig where carp are likely to feed.
- Patience: Carp fishing requires patience and persistence. Be prepared to wait for the fish to find your bait and take it confidently.
Common Mistakes to Avoid
- Incorrect Hair Length: If the hair is too long or too short, the bait will not be positioned correctly, and you may miss bites. Always check the hair length before casting.
- Weak Knots: Ensure that all knots are tied correctly and tightened properly. Weak knots can result in lost fish.
- Inappropriate Bait Size: Match the size of your bait to the hook size and the size of the carp you are targeting. Using bait that is too large or too small can reduce your chances of success.
- Poor Hook Point: Always check the sharpness of your hook. A dull hook will not penetrate the carp’s mouth effectively, leading to missed bites and lost fish.
- Not Adapting: If you are not getting bites, be prepared to change your bait, hook size, or location. Carp can be finicky, and small adjustments can make a big difference.
Advanced Techniques
Once you have mastered the basic hair rig, you can experiment with advanced techniques to improve your carp fishing success.
Pop-Up Rig
A pop-up rig uses buoyant bait to lift the hook off the bottom, making it more visible and attractive to carp. To tie a pop-up rig, follow these steps:
- Tie a basic hair rig as described above.
- Add a small piece of buoyant material, such as foam or a pop-up boilie, to the hair.
- Use a shot or a tungsten putty to balance the rig so that the hook floats just above the lakebed.
Blowback Rig
The blowback rig is designed to improve the hook-up rate by allowing the bait to slide back on the hook shank when the carp tries to eject it. To tie a blowback rig:
- Tie a basic hair rig with a long hair.
- Slide a small piece of silicone tubing onto the hooklink material before tying the knotless knot.
- Position the tubing over the knot and onto the hook shank to hold the hair in place.
D-Rig
The D-rig is a popular choice for anglers using pop-up baits. It provides excellent bait presentation and increases the chances of hooking the carp. To tie a D-rig:
- Tie a small loop at the end of the hooklink material.
- Pass the hooklink material through the eye of the hook from the back to the front.
- Form a “D” shape by threading the tag end through the loop and pulling tight.
- Attach a small rig ring to the loop to hold the bait.
Conclusion
Tying a basic carp hair rig is a fundamental skill that every carp angler should master. With the right materials and a little practice, you can tie effective hair rigs that will improve your chances of catching carp. Remember to pay attention to the details, such as hair length and knot strength, and be prepared to make adjustments based on the conditions and the behavior of the carp. By following the steps outlined in this guide, you will be well on your way to becoming a successful carp angler.


314 Replies to “Is the basic hair rig dead? or could it bag you a fish?”
Fantastic post! I really enjoyed reading this 🙂 Keep up the
good work.
The upper materials is fabricated from so-known as "
Engineered Mesh", which Nike describes as more durable in comparison with "Flyknit" higher materials, but is inferior to it in terms of comfort.
It consists of 5 bones. Within the course of the period of reregulation, by which the muscles adapt
to the grown bone, pain can happen, for example in the
Achilles tendon attachment. Nowadays, this mannequin is having fun with
new reputation within the wellness and chiropractic sector, as this Geta variant is alleged to learn the sense of stability, body balance and the leg muscles.
Above all, I used to be sure that essentially the most difficult
part, which I would have to concentrate on primarily the most, would be the
musculoskeletal system and particularly the legs. Our foot care tips for summer show that foot care doesn't need to be difficult or time-consuming.
Barefoot footwear for summer time are usually not appropriate for winter.
And I have already revealed just a few articles about our barefoot footwear.
Uncover the world of winter-proof barefoot sneakers at Toe
Play today and get pleasure from the liberty of natural walking, even when it will get cold.
Should you've already gotten your toes used to walking barefoot and
are looking for a new challenge, then take a barefoot walk within the
forest. The more typically you do this, the extra your feet will get
used to it and you may attempt new issues, like a barefoot park.
Hey! This is kind of off topic but I need some advice from an established blog.
Is it tough to set up your own blog? I’m not very techincal but
I can figure things out pretty quick. I’m thinking
about setting up my own but I’m not sure where to begin. Do you have any points or suggestions?
Thanks